Tuesday, February 25, 2014

Gluten-Free Duree Macaroni 'n' Cheese

I cannot believe how cold it has gotten again! I know it is the last week of February, but since living in Kansas City I do remember times when spring has made an early arrival. I have noticed hints of tiny green bulb flowers trying to peek their way out of the ground around warmer parts of buildings. It is still too early to tell what flowers they will bring; however, I know everyone will smile and welcome their presence.

Growing up with long harsh winters is not a new thing to me since I grew up in Iowa. I remember living in Storm Lake, Iowa very early in my childhood. While I may sound like a senior citizen, I do remember snow drifts as tall as our house. One year, my dad helped us build a slide and fort fit for an Eskimo. We then moved to southern Iowa. It did not snow quite as fierce, but we still got a lot of snow. He was the kindergarten through 12th grade principal in Blakesburg, Iowa. When they were debating on whether or not to call off school, the superintendent would call my dad and ask if the bus would be able to make it up our steep, hilly driveway to pick me up for school. If the bus couldn't make it, instant snow day! We knew my parents would not be able to make it out either. We were snowed in. Above all, what I remember most about those cold winters was my mom and dad making the cheesiest, most gooiest macaroni and cheese.

  
We always had milk, some sort of noodle, butter, and a brick of cheese on hand just in case. It has taken a little bit of practice to create a gluten-free version as close to home as this. I think I've finally got it. This recipe is super simple with the most basic of ingredients. I've taken out the flour and regular pasta noodles, yet maintained a creamy consistency by cooking the noodles directly in the sauce. If you are looking for a comforting dish that reminds you of your childhood, this is it!

Gluten-Free Duree Macaroni 'n' Cheese

Nonstick cooking spray
1 1/4 cups skim milk
8 oz. 2% Velveeta cheese, cut into cubes
4 oz. 1/3 less fat cream cheese, softened
1 tablespoon dried chopped onion
1/4 teaspoon salt
1/4 teaspoon freshly ground black pepper
2 cups dried gluten-free noodles (can be any shape)
1 cup shredded 2% cheddar cheese

Spray a large casserole dish with nonstick cooking spray. Set aside. Place milk, Velveeta, cream cheese, dried onion, salt, and pepper in a large sauce pan. Heat over medium-low heat, whisking occasionally, for 10 minutes or until all ingredients are smooth and combine. Toss pasta into the sauce pan. Stir to combine. Pour into your casserole dish. The mixture will be soupy at this point. It is okay as the noodles will eventually absorb the excess liquid. Cover and store in the refrigerator for 1-2 days. When you are ready to bake and serve, uncover the dish, give the pasta a stir to break up any noodles that have clumped together and release the starches to thicken the sauce. Let set at room temperature while your oven preheats at 375 degrees. When your oven is preheated, stir again, place in the oven, and bake for 25 minutes. Pull the dish out. Stir once again to break up any pasta that has clumped together. Sprinkle the cheddar over the top. Bake another 5 minutes or until the cheddar has melted and begins to bubble. Remove from the oven and let it stand for 5 minutes before serving. 

Sunday, February 23, 2014

Simple Beginnings Menu Post

What a weekend it has been! My sisters and mom all made it to town to celebrate February and March birthdays. We had so much fun catching up and shopping together. The weather was outstanding! I even made it out Friday afternoon for a good 3 mile run before everyone arrived. While it is supposed to be pretty chilly this week, I was able to purchase some good winter gear on sale that will be perfect for chilly running conditions. It was all fashionably approved by my family fashionistas:).

Since we were all enjoying spending time together, I did not plan the menu post until around noon today. I was really lacking in the creativity department as I started to feel the Sunday slump approaching. It always happens when you have such a great weekend with the ones you love. Thus, I chose to turn this little feeling into something positive with my menu. I needed to keep it simple, so I brought out some old favorites I used to cook when I was trying to win the Bear over at the beginning of our relationship. I was not a good cook, so these are a couple of the recipes that managed to win the Bear over. I needed very simple recipes that did not require a lot of ingredients or time to prepare. Back then I was not a gluten-free girl. Now that I have a better knowledge base with gluten-free cooking and convenience it just seemed perfect. I thought it would be fun to recreate some oldies and make them gluten-free. The Bear was pretty pleased to say the least. I too started to feel a little spark when I pulled out the old recipes. The memories just made me smile. These are two of the recipes I made over and over during the simple beginnings of our relationship. Tonight we will be keeping it pretty simple with grilled chicken, veggies, and potatoes that we purchased from our grocery store in hopes that we are not out of grill gas. Something we used to do a lot when I didn't know what else to do. If we are out of grill gas it might be Domino's delivery. Otherwise, here is the plan for Monday through Thursday this week:

Monday 2/24          Gluten-Free Duree Mac'n'Cheese with Steamed Broccoli and Carrots

Tuesday 2/25          Leftovers

Wednesday 2/26     Baked Chicken and Bean Burritos with Salad

Thursday 2/27         Leftovers

I am not sure what next weekend will hold, but I hope these two recipes will be something you can use again and again like we have. Here are a few of the things you will need to make this all happen:

1 lb. ground chicken breast
1 bag baby carrots
1 bag pre-cut broccoli
1 bag of your favorite salad blend
1 package gluten-free tortillas (I used Udi's)
1 can fat-free refried beans
1 can diced green chilies
1 package taco seasoning (I used Old El Paso it is gluten-free)
1 box gluten-free penne pasta (I bought Barila this time because I had a coupon. We'll see about this)
1 half gallon skim milk
1 brick 2% Velveeta cheese
1 8 oz. package 1/3 less fat cream cheese
1 package shredded 2% cheddar cheese

Pantry items you will need:

Nonstick cooking spray
Dried chopped onion
Salt
Pepper

Buffalo Chicken Meatballs

In the morning, I go into third grade math and co-teach with another teacher. I really love the atmosphere this teacher has started to create with her classroom. She does not have an easy bunch of students, but has started to really build a sense of community. At the start of the day, we all join together in a circle. We then go around the circle and express one thing we (children and adults) are grateful for without repeating the previous day's gratitude. After we express our gratitude, we go around the circle again and say "good morning" and give each other a high five. It's just such a great way to start the day!

After I made these lovely meatballs, I told the kids I was really happy that I tried a new recipe and it turned out. They of course giggled knowing that I do have this blog and love creating new recipes. They then asked about what I had made. When I told them it was a meatball version of hot wings, they all got pretty excited.


I guess kids like hot wings. If your kiddos are not a fan of the spiciness, you could easily substitute a milder hot wing sauce. I happen to love Cookie's Hot Wing Sauce. It has the perfect amount of zing without setting your mouth on fire. I used a cookie scoop to make my meatballs for ease and portion control. If you do not have a cookie scoop, I suggest using a soup spoon.

Buffalo Chicken Meatballs

1 lb. ground chicken breast
1 package dried gluten-free ranch dressing mix
1 teaspoon dried chopped onion
1/2 cup hot wing sauce
1 tablespoon light butter, melted

Preheat your oven to 375 degrees. Line a cookie sheet with parchment paper or spray with nonstick cooking spray. Set aside. In a large mixing bowl, fold together the ground chicken, ranch, and onion until combine. Using a cookie scoop or soup spoon, scoop out approximately 2 1/2 tablespoons of meat into your hands. Roll into a ball and place on the parchment paper. Repeat until you have used all of the meat mixture. Place in the oven and bake for 30 minutes or until the meatballs begin to turn very lightly brown on the outside. Remove from the oven. Place in a casserole dish. Pour the hot wing sauce and butter over the meatballs. Toss to coat and serve.

Tuesday, February 18, 2014

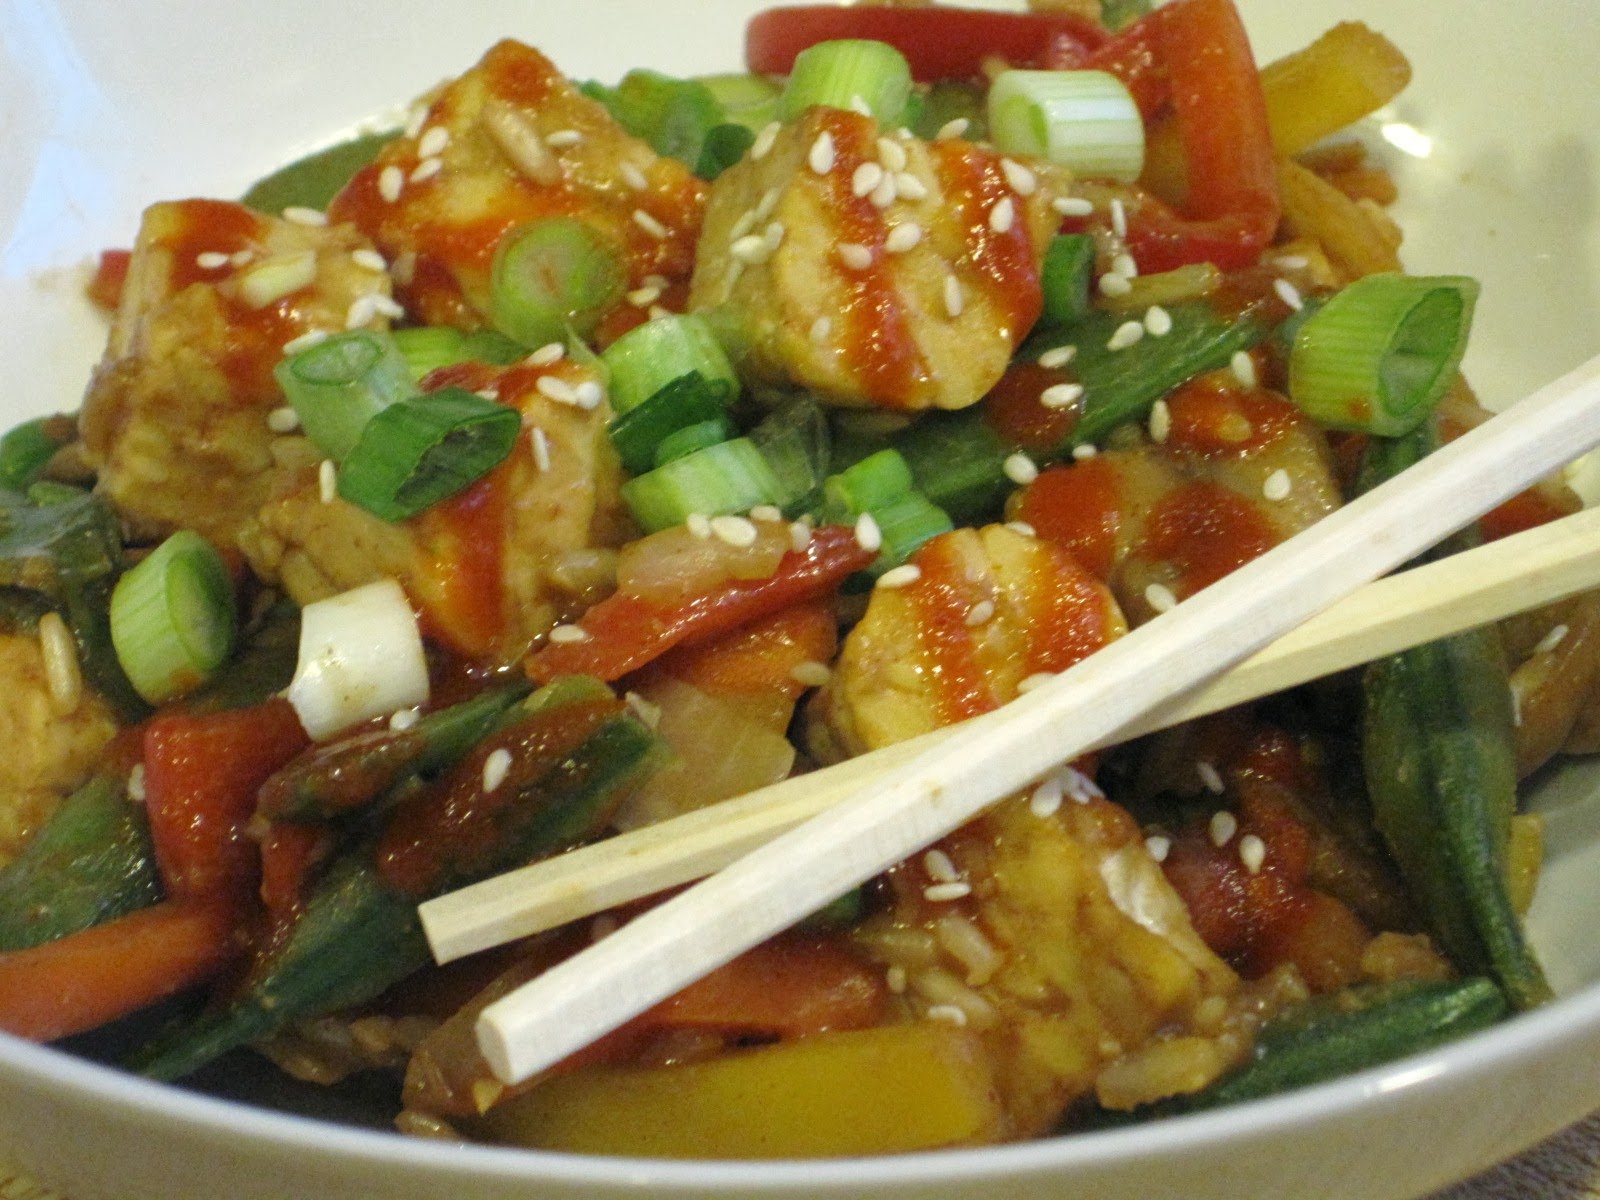
Tempeh Stir-Fry with Almond Sauce

Once upon a time, Rachel Ray swept the world with her 30 minute meals. Lately, I've noticed that people are trying to break that record with now 20 or even 15 minute meals. It kind of makes me laugh a little.

Okay, enough of my thoughts on time in the kitchen. This little recipe uses an ingredient I have been afraid to use for a long time- tempeh. After having some kitchen losses and never quite grasping how to work with tofu, I didn't even want to mess with its cousin tempeh. Well, I was wrong in thinking this. Tempeh is soooo much easier to work with. Being it is firmer, it does not crumble or fall apart as easily as tofu. The texture is amazing too! I almost had Justin fooled until he looked at the menu on the fridge and asked, "What the heck is tempeh? You're not trying to mess with tofu again are you?" To that I said, "It's just tempeh. Not tofu and don't worry about it." Ha ha ha!!


You can expect more tempeh recipes to come my friends. I heart tempeh. And back to my earlier rant, this meal only took me between 15-20 minutes to make. How's that for a meatless Monday?

Tempeh Stir-Fry with Almond Sauce
inspired by Weight Watchers

Nonstick cooking spray
1 16 oz. bag frozen stir-fry vegetables
1 8 oz. package tempeh, cut into cubes
3 tablespoon gluten-free, reduced sodium soy sauce
2 tablespoons rice vinegar
1 tablespoon smooth almond butter
1 tablespoon brown sugar
1 teaspoon sriracha sauce
1 clove minced garlic
1/2 teaspoon ground ginger
1 bunch green onions, chopped

Heat a large nonstick skillet or wok over medium-high heat. Spray with nonstick cooking spray. Add the vegetables. Cook, stirring occasionally for 5 minutes or until thawed. Add the tempeh. Cook another 5 minutes or until heated through. Meanwhile, in a small dish whisk together the soy sauce, rice vinegar, almond butter, brown sugar, sriracha sauce, garlic and ginger until smooth. Pour over the vegetables and tempeh. Cook for another 3 minutes or until the sauce begins to slightly thicken. This would be great over rice noodles or hot brown rice.

Monday, February 17, 2014

Lemon Chicken Artichoke Soup

My poor mother has been sick with pneumonia for well over a month now. She called me last week on Wednesday informing me that she might not be able to make it to super sister weekend if she was still under the weather. We were all super disappointed and worried that she might have to go to the hospital. Today, she sent us all a little text that she had been to the doctor and is finally on the mend! I hope she stays well as she has really been through it this winter. It is so hard when your family is away and you can't be there to help out. While I love living here in Kansas City, it is difficult to be away from family and friends. Especially when someone is not feeling well.

They say chicken soup really has no major medicinal purposes. When I saw this soup at Whole Foods, I began to think the contrary. With lemon, veggies, and herbs, I cannot see why this chicken soup version would be anything but medicinal if you were feeling under the weather. I gave my version an even healthier dose by switching out spinach for kale.


I froze some leftovers to send with my mother in hopes that she remains well and can make it this coming weekend for our birthday extravaganza. You know, just to keep her healthy and let her know how much I love her:). Whether you are feeling a cold coming on or just need a little reminder that spring is just around the corner, the lemon and artichokes give this traditional chicken soup a little pick-me-up. It is the perfect soul satisfying soup on a chilly winter night.

Lemon Chicken Artichoke Soup
inspired by Whole Foods

1 teaspoon olive oil
2 boneless skinless chicken breasts
1/4 teaspoon salt
1/4 teaspoon freshly ground black pepper
Zest of one lemon
1/2 cup carrot, finely chopped
1/2 cup celery, finely chopped
1 yellow or white onion, finely chopped
1 clove minced garlic
Juice of one lemon
2 cups kale, finely chopped
1 can quartered artichoke hearts, drained
1 teaspoon herbes de Provence
4 cups reduced sodium, gluten-free chicken broth
1 tablespoon gluten-free chicken base (I used Better Than Bouillon)
1 cup water
2 tablespoons corn starch

Drizzle the olive oil in the bottom of a large non-stick skillet. Heat to medium-high. While the skillet is heating, season both sides of the chicken breast with the salt, pepper, and lemon zest. Place in the skillet. Cook for 5 minutes or until browned. Using tongs, turn the chicken and cook the other side of the chicken breasts for another 5 minutes or until browned. It is okay if they are not cooked all the way through. They will finish cooking in the soup. Remove the chicken breasts from the skillet and set on a plate. Add the carrot, celery, onion, and garlic to the skillet. Cook, stirring occasionally to pick up any brown bits for 5 minutes or until the vegetables have softened. Add the lemon juice. Stir to pick up any more browned bits and remove from heat.

Place the chicken, vegetables, kale, artichoke hearts, herbes de Provence, and chicken broth into a slow cooker. Stir to combine. Cover and set on low. Cook for 5-6 hours. Uncover, shred the chicken using two forks. In a small dish, whisk together the chicken base, water, and corn starch until smooth and combine. Add to the soup mixture. Stir to combine. Cover and cook for another 20-30 minutes, stirring occasionally until the soup begins to slightly thicken and serve.

Sunday, February 16, 2014

Fun Foods Menu Post

I must say it feels good to be caught up on the blog. If I could I could blog full time, I totally would. Blogging, however, does not currently pay me enough to do so. Maybe someday it will. As I was catching up from last week and shopping for the Bear's Valentine's Day gift Friday, I took a trip to Whole Foods. I absolutely love going to Whole Foods. There are so many things to look at. I didn't have much of an agenda or grocery list. I was looking for inspiration. I knew Saturday, my normal menu planning day, was totally out since the Bear talked me into volunteering for the engineering society's Math Counts event. So, the planning had to get done Friday.

Whole Foods did not disappoint in the inspiration department. I got ideas for an awesome soup that is simmering away in my Crock Pot as we speak. Meatless Monday is planned with a new ingredient I picked up- tempeh. And, I came up with another fun meatball recipe for a great midweek meal. The only problem, I almost came up with too many ideas! I have yet to plan Friday night's meal for my super sister weekend. So, there will be lots more to come this week on A Nickel's Worth of News. Here is the rundown:

Sunday 2/16            Lemon Chicken Artichoke Soup with Parmesan Toast

Monday 2/17          Tempeh Stir-Fry with Almond Sauce

Tuesday 2/18          Leftovers

Wednesday 2/19     Buffalo Chicken Meatballs with Roasted Potatoes and Broccoli

Thursday 2/20         Leftovers

A few of the items you will need:

2 boneless skinless chicken breasts
1 lb. ground chicken breast or lean ground turkey breast
1 package center cut bacon
1 8 oz. package tempeh
1 package baby carrots
1 bunch celery
2 yellow or white onions
1 bulb garlic
1 lemon
1 bunch kale
1 bunch green onions
1 bag baby potatoes
1 can quartered artichoke hearts
1 bottle gluten-free buffalo wing sauce (I love Cookies')
1 package gluten-free ranch dressing mix
1 box reduced sodium gluten-free chicken broth
1 jar gluten-free chicken base (I like Better Than Bouillon)
1 bag frozen stir-fry vegetables
1 bag frozen broccoli

Pantry items you will need:

Extra virgin olive oil
Almond butter
Gluten-free soy sauce
Brown sugar
Corn starch
Rice vinegar
Srircha sauce
Ground ginger
Herbes de Provence
Salt
Pepper

Have a great rest of your weekend! I look forward to posting and sharing throughout the week!

Gluten-Free Double Decker Pepperoni Deep Dish Pizza

Wow! That was a mouthful to say. Gluten-Free Double Decker Pepperoni Deep Dish Pizza. Try saying that five times fast. This was our Valentine's Day meal. With Valentine's Day falling on a Friday, we just didn't feel like fighting the crowd. We did celebrate last night though, with an awesome date night at one of our favorite Mexican restaurants. Dos Reales is close, reliable, and we can usually drop in and get seating immediately. My kind of place.

Anyway, back to this fabulous pizza. This dish was inspired by Olympic speed skater Shani Davis, a Chicago native. Like Shani, I love deep dish pizza. Believe it or not it is so easy to make your own at home. The trick to making deep dish pizza? A well seasoned cast iron skillet. Something about the cast iron allows the pizza crust to get perfectly golden brown all around the edges while at the same time evenly heating the toppings. If you do not have one, I highly suggest you go and get one now I say!


Ahh...shear decadence! This pizza is loaded with cheese, turkey pepperoni, and more cheese. To cut some of the calories a little, I used fat-free mozzarella and shredded Parmesan. Harder cheeses such as Parmesan pack a ton of flavor for fewer calories. If you are looking for a taste of the windy city at home, you will want to make this pizza.

Gluten-Free Double Decker Pepperoni Deep Dish Pizza

1 tablespoon olive oil
Really Good Gluten-Free Pizza crust dough
1 package turkey pepperoni
1 package fat-free mozzarella cheese
1 package shredded Parmesan cheese
1 cup jarred spaghetti sauce

Heat your oven to 425 degrees. Drizzle the olive oil in a 10-inch seasoned cast iron skillet. Using a paper towel, wipe oil all around the bottom of the skillet and up around the edges. Press pizza dough into the bottom of the skillet and one inch up around the edges to form the crust. Layer 1/2 of the pepperoni on the bottom of the crust. Sprinkle 1/2 cup each of the mozzarella and Parmesan. Place the remaining 1/2 of the pepperoni on top of the cheese. Sprinkle another 1/2 cup each of the cheeses over the pepperoni. Ladle the sauce over the cheese. Sprinkle remaining packages of cheese over the sauce. Bake in the oven for 40 minutes. Let stand for 10 minutes before slicing and serving.