Pages

Saturday, March 31, 2012

Taquitos Turned Tacos

There are a lot of things going for me.  I have a wonderful husband.  We have a great house.  Our families both really get along quite well even my blended family.  We both are blessed with great jobs.  Sometimes, as good as things are, mistakes happen.  For example, we went furniture shopping today.  We've been saving for new bedroom furniture that we can call our own for quite some time now and today was the day.  So we headed up to Nebraska Furniture Mart, found an awesome deal on a set, and made our purchase.  Then we realized we needed a matching media console for our television not really thinking about the space and the massive chest of drawers that came with our set.  So, we went down to the living room furnishings and purchased a console we thought would be a good match.  The bedroom set will not arrive until May.  The console was ready for pick up.  We brought it home...and then I freaked out.  "Bear, I don't think we thought this through enough," I say.  The Bear replied, "What do you mean?"  "Well, um where are we going to put the large set of drawers with the mirror on top?" I said.  "Oh $h*t.  You're right!" the Bear says.  Oh $h*t is right people.  We have a large bedroom, but not enough room for our new console.  So, I guess the console will have to go in the living room.  Really it is okay because our media console right now was a pre-marital purchase Justin made and looks straight out of fratville.  The color of the finish does not totally match the rest of our furniture, but it is far better than what we've got going on right now.  Yin-yang.

So goes my Very Veggie Beef Taquitos tonight.  I was all geared up for a sweet taquito surprise and this happened in the oven:


Yeah, that's my oven.  I opened the door after running 2.5 miles on the treadmill at the gym 45 minutes earlier to find this little beast of a happening.  I was trying to calm myself down after dropping $400 on a media console that would not fit in our bedroom.  Not very photogenic, but at least I'm being honest.  Recipe mishaps happen.  No one is perfect.  So, to make the recipe more successful, yes even for the rookies, I turned the taquitos into tacos.  Something a little more photo friendly and palatable.


Beef Taquitos Turned Tacos with Edimole

For the tacos:
1/4 pound lean ground beef
1 red onion, finely diced
1 yellow or red bell pepper, finely diced
1 clove crushed garlic
1 can black beans, rinsed and drained
1 can fire roasted tomatoes (preferably salsa style)
2 tablespoons taco seasoning (I use Penzy's)
Corn tortillas

For the edimole:
1 cup thawed edimame
Juice of one lime
1 clove crushed garlic
1/4 cup cilantro, chopped
2 avocados
1/4 cup fat-free sour cream
1/4 cup salsa of your choice

Heat a large skillet over medium heat.  Coat with non-stick cooking spray.  Add the beef and cook, breaking up the meat with a spatula, until browned.  Add onion, peppers, and garlic.  Cook, stirring occasionally until the vegetables have softened.  Add the black beans, tomatoes, and taco seasoning.  Cook, stirring occasionally until the mixture begins to thicken.  Remove from heat.  Set aside.

Set a medium sized skillet or griddle over medium high heat. If you are using a skillet you will only be able to heat the tortillas one or two at a time. If you have a pancake griddle you can heat several at a time. Place corn tortillas onto the skillet or griddle. Heat the tortilla(s) until they begin to fluff a little, then flip and heat another minute or so. Remove from heat with a spatula. Fill with the beef mixture and serve with salsa and the edimole (edimole recipe below).

Blend edimame in a food processor or blender until smooth.  Add the lime juice, garlic, cilantro, avocados, sour cream, and salsa.  Process or blend until smooth.  Serve along with the tacos or with tortilla chips.  It is a totally "skinny" alternative to traditional guacamole if you are looking to save some calories.

This recipe is on my menu post for Sunday left-overs.  You can do as you choose.  I suggest the tacos, but it tastes the same no matter what:)


Saturday Menu Post

I love Saturdays!  Sleeping in, time to run errands, and menu planning are my favorite activities reserved for this day.  Spring is in full bloom here in Kansas City.  I can't believe it is the last day of March and we have leaves on some of the trees and pollen fries rearing to flourish on the tall oak trees in our yard.  It really feels and looks more like the middle of May. 

This week's menu post includes opportunities for firing up the grill and enjoying the lovely weather.  Sunday you can save some bucks on using left-over beef taquitos.  I will be posting the recipe later this evening to share.  Monday's forecast is yet another 80 degree day, so we will be grilling some chicken kabobs with a side of yogurt sauce and a Mediterranean quinoa salad.  Wednesday I am on my own as the Bear is in his final weeks of his last graduate class.  I will be experimenting with a tofu recipe I discovered.  I've not really ever worked much with tofu, but know there are tons of health benefits.  Thursday is pizza night.  We will wrap the week up with another evening spent on the patio grilling steaks served with a roasted pepper salsa.  This week's rundown and grocery list is as follows:

Sunday 4/1        Left-over Veggie Beef Taquitos with Edimole (recipe to be posted later today)

Monday 4/2      Chicken Kabobs with Yogurt Sauce & Greek Quinoa Salad

Tuesday 4/3      Left-overs

Wednesday 4/4 Blackened Tofu with Quinoa & Sauteed Kale

Thursday 4/5     Butternut Squash, Spinach, & Goat Cheese Pizza

Friday 4/6 or     Steak with Roasted Pepper & Caper Salsa & Mashed Potatoes
Saturday 4/7

What you will need:

4 boneless, skinless chicken breasts
2 steaks of your choice ( we will most likely use sirloin)
1 package center cut bacon
1 package extra firm tofu
1 pound red skinned potatoes
2-3 lemons (depending on their size)
1 pint cherry or grape tomatoes
1 cucumber
1 green pepper
2 red onions
1 shallot
1 head garlic
1 bag cut and cleaned kale
1 bag spinach
1 jar kalamata olives
1 jar roasted red peppers
1 jar sliced banana peppers
1 jar capers
1 package personal sized pizza crusts (mine will be Udi's gluten-free crust, regular for the Bear)
1 bag quinoa
1 box low-sodium chicken broth
1 bag frozen butternut squash
4 oz. goat cheese
1 package feta cheese
1 container non-fat Greek yogurt
1 pint low-fat buttermilk

Pantry items you will need:

Paprika
Dried oregano
Dried dill weed
Cayenne pepper
Onion powder
Garlic powder
Low-sodium soy sauce
Sesame oil
Extra virgin olive oil

I hope you all are enjoying your weekend!  Happy spring!


Tuesday, March 27, 2012

Italian Chicken Sausage & Potato Cassoulet


One of my favorite foods is potatoes.  Mashed, hashed, smashed, baked, fried, doesn't matter, I love them.  Believe it or not, they are also good for you!  The once frowned upon carb bomb actually punches a hefty does of vitamins, minerals, and fiber.  I think there are far worse things in the world and am not afraid of the potato.  I love it!

I also loved in place of pasta in this recipe and swapped pork sausage for chicken sausage.  My favorite brand is Isernio's.  It is gluten-free, lean, and available at your local Super Target for under $5.  Check out the stats:

If you cannot find Isernio's chicken sausage, chicken sausage links or an Italian style turkey sausage will work as well.  If you want to make this cassoulet vegetarian, feel free to leave out the sausage.  It is plenty filling!

On a side note, a cassoulet, as defined by Wikipedia, is a slow cooked French casserole.  I kind of get tired of the word casserole.   While this dish was not slow cooked I felt it was too elegant to be called a casserole. It also gave me an excuse to use my large, red Le Creuset baking dish I never get to use.  See!  This is not just your mama's tuna noodle casserole.  It is a cassoulet:)

Italian Chicken Sausage & Potato Cassoulet
8 medium red skinned potatoes, cut into 1 inch cubes
1/4 teaspoon salt
1/4 teaspoon pepper
8 oz. Italian chicken sausage
1 yellow onion, thinly sliced
1 clove crushed fresh garlic
2 yellow peppers, thinly sliced
1 cup mushrooms, thinly sliced
1 14.5 oz. can diced tomatoes
2 tablespoons tomato paste
1 teaspoon dried oregano
1 teaspoon dried parsley
1/4 teaspoon crushed red pepper flakes
1/2 cup shredded 2% mozzarella cheese
2 tablespoons chopped fresh basil

Pre-heat your oven to 400 degrees.  Spray a large baking dish (13 x 9 will do) with non-stick cooking spray.  Place the potatoes in the dish and season with salt and pepper.  Roast the potatoes for 30-40 minutes or until slightly browned.  While the potatoes are roasting, heat a large non-stick skillet over medium heat.  Brown the chicken sausage until cooked through.  Remove the sausage from the skillet into a dish and set aside.  In the same skillet, add the onions and garlic.  Cook, stirring occasionally until the onions are soft and translucent.  Add the peppers and mushrooms.  Cook and stir occasionally until the peppers soften and the mushrooms brown.  Add the sausage back to the skillet.  Add the tomatoes, tomato paste, oregano, parsley and red pepper flakes.  Cook, stirring occasionally until the sauce begins to thicken.  When the potatoes are slightly browned, pour the sauce over the potatoes.  Sprinkle the cheese over the top.  Bake in the oven for another 10 minutes or until the cheese is melted and bubbly.  Remove from the oven and garnish with the fresh basil. 

In other news, I have to thank my new Food Buzz friend Neshanne from Oishii Treats.  She nominated me for a Versatile Blogger Award!  I am so excited!  So I do not mess up my formatting, I've included the expectations below.  Here are some blogs I've recently discovered since joining Food Buzz:

1.  Feed Your Soul
2.  Peas & Crayons
3.  Saucy Gourmet
4.  Seaweed & Sassafrass
5.  She Makes & Bakes
6.  Happy Valley Chow
7.  Feeding Las Vegas
8.  Young Grasshopper
9.  The Not so Desperate Chef Wife
10.  Flour Trader
11.  A Kitchen Addiction
12.  Oishii Treats
13.  Forkful of Comfort
14.  La Cucina Prima Donna
15.  Lady Behind the Curtain
Here are the rules for the Versatile Blog Award:
  • Thank the person who gave you this award.
  • Include a link to their blog.
  • Next, select 15 blogs/bloggers that you’ve recently discovered or follow regularly.
  • Nominate those 15 bloggers for the Versatile Blogger Award.
  • Finally, tell the person who nominated you 7 things about yourself.
There are also a few add-on rules:

  • In the same post, include this set of rules.
  • Inform each nominated blogger of their nomination by posting a comment on each of their blogs
So, what is the Versatile Blogger Award? ”It is a great way to introduce different bloggers to each other and to promote quality blogs that awardees and their readers may not have discovered otherwise.”


Monday, March 26, 2012

Cuban Stuffed Chicken Breast

The challenge is off to a great start!  I have not really felt incredibly hungry all day.  The original plan has you eating more at one sitting.  While at work, I unfortunately do not have the time to eat all of the food.  Not to be one to let myself starve, however, I have chosen to spread some of the bulk throughout the day.  For example, I was to eat a salad for lunch with a side of strawberries.  This salad was a fairly heafty salad with 2 cups of greens, 2/3 cup lentils, 1/2 cup diced beets, 1 oz. goat cheese, and 2 tablespoons balsamic dressing (I used my better than Panera recipe).  I ate the salad for lunch and saved to berries for a snack later in the afternoon.  I also have accomdated some of the recipes to fit our pallet.  See the Cuban Stuffed Chicken Breast below:


The challenge suggests eating a chicken breast stuffed with salsa, cheddar, and broccoli served with brussel sprouts and a sweet potato.  Sounds fine, but I thought this had a little more pep in the step.  The components of a Cuban sandwich swiss cheese, tasty pickles, and ham are stuffed into a chicken breast.  I've also made this with pork loin.  You must try it!

Cuban Stuffed Chicken Breast
(adapted from Cooking Light's Cuban Stuffed Pork)

4 boneless, skinless chicken breasts
2 dill pickle spears, chopped
1 tablespoon Dijon mustard
6 slices lean deli ham
2 slices Swiss cheese cut in half
Toothpicks
Salt & pepper to taste

Pre-heat your oven to 375 degrees.  In a small dish, combine the pickles and mustard.  Set aside.  With a very sharp knife, cut a slit into each chicken breast.  Stuff each breast with 2 slices of ham, 1 tablespoon of the pickle mixture, and 1/2 of a slice of Swiss cheese.  Secure the opening of the chicken with toothpicks.  Place each chicken breast on a baking sheet coated with non-stick cooking spray.  Bake for 30 minutes or until the internal temperature of the chiken is 165 degrees.  Cool for 5 minutes before serving.

Saturday, March 24, 2012

Saturday Menu Post & Super Foods

Yesterday was casual Friday at our school.  To cheer on KU, I sported one of my favorite t-shirts.  It was a little snug, but I managed to layer a navy blue fleece to hide my love chub.  My teaching style is very interactive with a lot of music, movement, and other adaptive materials such as yoga balls, t-chairs, and tube socks filled with rice to accommodate for the sensory needs of my little first and second graders.  During my interactive reading instruction, I sat on a large yoga ball and had two other students sitting on t-chairs on my right and left side.  We had just finished practicing sight words which included dancing.  I was a little hot and had removed my fleece not thinking about my little bit of love chub around my belly.  While I was pointing at a book for another student in front of me, I suddenly felt a wiggly little finger poke at my said love chub.  I laughed out loud and said to the student, "Did you just poke my love chub?"  He gave me a giggly reply, "Yes!  My dad has that too." 

Not to ever go into a self-destructive body image pattern, I laughed it off.  But, I have decided one thing; the belly has got to go people!  Since turning 30, I have been trying to shed a pesky 10 pounds that has unfortunately put me in the "overweight" category according to my BMI.  I eat very healthy, am somewhat active (see above teaching style:)), but know I could be doing more now that my 20 something metabolism has come to a screeching halt.  This week, I got my monthly Self magazine in the mail.  Per their usual yearly format, they have the Drop 10 challenge with meal plans, exercises, and a tracking sheet.  I was very pleasantly surprised to see that most of the recipes included in the meal plan are gluten-free and include a ton of super foods which as research suggests help ignite metabolism.  I have decided to take on the challenge as an experiment and will track my progress through the online tracking system.  My plan is to adapt some of the meals with some additional herbs, spices, and veggies as they look like they need a boost in the flavor department.  This week's menu and grocery list includes:

Sunday 3/25         Cuban Stuffed Chicken Breast with Baked Sweet Potatoes & Asparagus

Monday 3/26        Left-overs

Tuesday 3/27        Chicken Sausage Skillet with Mixed Greens Salad

Wednesday 3/28   Left-overs

Thursday 3/29      Tossed Quinoa Salad with Kiwi & Strawberries

Friday 3/30 or       Baked Taquitos with Black Bean & Avocado Salad
Saturday 3/31

Groceries you will need:

Avocado
Apples
Bananas
Kiwi
Strawberries
Grapes
2 Limes
2-3 bags baby spinach
2 bags mixed greens
Cucumber
Asparagus
1 head garlic
1 package stoplight peppers (red, green, yellow)
1 bunch cilantro
1 bag red potatoes
Mushrooms
6 boneless, skinless chicken breasts
Chicken sausage
Deli sliced honey ham
1 bag quinoa
1 can diced tomatoes
1 can or jar of beets
1 bag lentils
1 can chickpeas
1 can black beans
1 jar all natural peanut butter
Goat cheese
1 tub plain, non-fat Greek yogurt
Almond milk
Stevia

Pantry items you will need if you do not have them:

Non-stick cooking spray
Olive oil
Balsamic vinegar
Chipotle peppers in adobo sauce (you can buy these in a can in your grocery's Hispanic food isle and freeze the rest in a plastic bag for future use)
Dried parsley
Dried oregano
Dried basil
Hebes de Provence
Crushed red pepper flakes
Taco seasoning (I use Penzy's)

I prepare all of my lunches for the week and store them accordingly so they are ready to grab and go.  I plan on drinking my daily Green Monster for breakfast in the morning and too include a morning snack of apples with peanut butter dip and yogurt and berries sweetened with stevia for my afternoon snack. If you were wondering what the lentils, beets, and goat cheese are for it will be in my salad I plan to take to work this week.  The super foods included in the challenge are apples, quinoa, lentils, olive oil, yogurt, sweet potatoes, and kiwi.  The plan suggests adding healthy fats, proteins, fiber, essential amino acids, vitamins, and resistant starch to help boost metabolism.  If you would like to learn more about the challenge, check out http://www.self.com/drop10 .  I look forward to sharing my posts with you this week!  Have a great weekend!

Friday, March 23, 2012

Veggie Burgers

"It is the Americans who have managed to crown minced beef as hamburger, and to send it round the world so that even the fussy French have taken to le boeuf hache, le hambourgaire." ~ Julia Child

I wish I could say everyone loves burgers, as most do.  My husband loves them.  My sisters, mom, dad, brother-in-law, friends, you name it all love burgers.  I do not like hamburgers.  The only burger that has ever rocked my palate was from Blanc Burgers in Leawood, Kansas.  And, it has to be the lobster burger from the Blanc in Leawood.  I've tried the Blanc Burgers on the Country Club Plaza and it wasn't the same.  Nope, not even close.  My sister tried the Blanc Burgers in Omaha after talking up our dining experience in Leawood and was very disappointed.  It has to be Blanc Burgers in Leawood if we are to ever recreate that special burger experience again.  Otherwise, I am not a burger person.  I don't know what it is.  It doesn't get me excited.  A veggie burger if gluten-free, however, will get me somewhat excited.  Especially this little gem I made last night...


I topped the burger with colby-jack cheese, spinach, tomatoes, caramelized onions, and gluten-free BBQ sauce served between a gluten-free bun (Shar brand). The recipe is really simple.


Veggie Burgers

2 cans chickpeas

1/2 cup broccoli florets

1/2 cup chopped carrots

1/4 cup chopped red onion

1/4 teaspoon chili powder

1/4 teaspoon paprika

1/8 teaspoon garlic powder

1/4 teaspoon salt

1/8 teaspoon freshly ground black pepper

2 tablespoons ground flax seed

1 tablespoon water


Add the chickpeas, broccoli, carrots, red onion, and spices to a food processor and roughly chop. Add the flaxseed and water and mix until the chickpeas become a rough paste.

Heat a large skillet over medium heat and swirl the olive oil. With your hands, scoop the chickpea mixture and flatten the mixture in your hands to form your patties. Add the patties, one or two at a time depending on the size of your skillet and cook for 4 minutes or until lightly browned. Flip the patty or patties and cook for another 4 minutes or until lightly browned. Top with any regular burger toppings and enjoy!

The Bear thought these burgers were okay, but I know he is very carnivorous. I have so many ideas for other burgers such as a Greek burger, Southwestern burger, the possibilities are endless. What would you maybe try?

Thursday, March 22, 2012

Chipotle Chicken Salads

I don't know what it is about the time of year, but I always feel like I need to freshen my plate up a bit.  Mmmm...salad.  While there is not much available in the way of summer produce, there are plenty of options in spicing up lettuce.  Homer Simpson said, "You don't win friends with salad," but I have had a lot of friends in the teacher's lounge asking me about my salad this week.  Justin and I ate this for dinner Monday and Tuesday.  It was so good, I ended up buying more salad makings to enjoy at work for lunch. Can you blame me?  Just look at the color!


Romaine lettuce, black beans, thinly sliced red onion, lush red tomatoes, corn, avocado, chicken, and the spicy chipotle dressing.  You can adapt the salad toppings however you want, but it is the dressing that really is the key player in this salad.

Chipotle Ranch Dressing

1/4 cup buttermilk
1 cup fat free sour cream
1/4 cup light mayonnaise (if you've read any previous posts, I adore Hellman's made with olive oil)
Zest of one lime
2 tablespoons freshly squeezed lime juice
1/4 cup fresh cilantro
1 chipotle chili canned in adobo sauce
1/2 teaspoon chili powder
1/2 teaspoon cumin
1/4 teaspoon salt

Blend all ingredients in a blender or food processor until smooth.  Use as a dressing for salads, wraps, or as a dip for tortilla chips.

Tuesday, March 20, 2012

Baked Ziti & a Delayed Menu Post

I apologize for the delay in my weekly menu post.  We went out of town for the weekend.  While I attempted to type and schedule the post last Friday, some sort of glitch occurred and the entire post was lost.  I'm not really sure what happened.

Being we were out of town over the weekend, my spring break is over, and there is a new time change to adjust to, I tried to keep things pretty simple this week.  Today's post will include our menu for the week and a recipe I use when I know there will not be much time to prep ahead.  Here is this week's menu:

Sunday 3/18        Baked Ziti with Broccoli

Monday 3/19       Chipotle Chicken Salads with Tortilla Chips

Tuesday 3/20       Left-overs

Wednesday 3/21  BBQ Cheddar Veggie Burgers with Sweet Potato Fries

Thursday 3/22      Left-overs

Friday 3/23          Chicken Pot Stickers over Mixed Greens
 

I learned this handy trick from my friend Jen back when we were in college.  This recipe requires no boiling, can be adapted to your taste by adding meat, more veggies, more cheese, whatever.  I've made this several times by using pizza toppings such as pepperoni, chicken sausage, mushrooms, green peppers, onions, black olives, and loads of cheese.  The beauty of the dish is that you can make it ahead and then pop it in the oven when you are ready to bake and serve.  Let this recipe be your canvas to an easy weeknight meal!

Baked Ziti

1 box gluten-free penne pasta (or any regular, tubular shaped pasta)
4 cups spaghetti sauce (I used 4 cups of my own sauce I had made earlier, you can use jarred)
2 cups part skim ricotta cheese
1/2 box thawed and drained chopped frozen spinach
1/4 teaspoon garlic powder
2 cups 2% mozzarella cheese

In a large bowl, mix your dried pasta and spaghetti sauce until the noodles are coated.  Pour the noodles into a large casserole or lasagna pan coated with non-stick cooking spray.  Set aside.

In a smaller bowl, mix the ricotta cheese, spinach, and garlic powder together until combined.  Spread the ricotta mixture over the noodles.  Top the ricotta layer with the mozzarella cheese.  Cover with aluminum foil and bake in the oven at 350 degrees for 25-30 minutes.  Then remove the foil and bake until the cheese is lightly browned and bubbly.  Let stand 5-10 minutes before serving. I topped my serving with additional sauce and Parmesan cheese before photographing and consuming.

So no one is left out of the loop, I will be posting the Chipotle Chicken Salad recipe tomorrow and the Veggie Burgers on Thursday.  Hopefully by Thursday I will be caught up on posting.  Stay tuned throughout the week.


Thursday, March 15, 2012

Sun Dried Tomato Shrimp

I'll be honest, as healthy as seafood can be, we don't eat much of it in the Nickel household.  Being we live in Kansas, there isn't a quality supply unless you want to pay out the biscuits at Whole Foods.  Costco and Sam's aren't too bad, but it still isn't as fresh as it could be.  Hy-Vee sometimes has an okay selection too, but it's still a gamble.  Not to mention the fact that my youngest sister, Amy, is deathly allergic to shrimp.  I'm leery to cook any seafood for fear that it won't turn out right, someone might get sick, or that my husband won't touch it.  Seafood is just too risky. 

Tonight I decided to take the gamble.  I bought the Bear some donut holes to ease his disgruntled manner.  Something about baked goods always helps a cranky husband:)  Donut holes or not, I think I won this hand.  He said it was "good" and that he "wouldn't mind having it again."  My trick to making my shrimp not taste too much like the sea...a good buttermilk soak.  I soaked my thawed shrimp in buttermilk and one teaspoon Old Bay seasoning for a couple of hours in the fridge.  It made the shrimp very tender and took out some of the fishy taste I think frozen seafood often has.  I'm not sure how it works, but it definitely helped.  My other crafty way to save some pennies, I didn't really use sun dried tomatoes.  I actually used some frozen oven dried tomatoes I made myself back when grape tomatoes were on special.  I take one pint of cherry or grape tomatoes and spread them on a baking sheet lined with foil sprayed with non-stick cooking spray.  Then, I lightly drizzle the tomatoes with a little extra virgin olive oil, pop them in the oven at 350 degrees and let them roast away until some of the tomatoes have burst or for about 45 minutes to an hour.  You can then store the tomatoes in the freezer and use them in pasta, pizza, or in this dish!

Sun Dried Tomato Shrimp

1 cup buttermilk
1 teaspoon Old Bay seasoning
18-20 large, peeled and deveined shrimp
1 teaspoon olive oil
2 cloves freshly crushed garlic
1 pint oven dried tomatoes (see directions above)
1/2 teaspoon cumin
1/2 teaspoon chili powder
Zest of one lime
2 tablespoons fresh lime juice
4 tablespoons freshly chopped cilantro
Salt & Pepper to taste

In a large baking dish, whisk together the buttermilk and Old Bay seasoning.  Add the shrimp, making sure each pieces is coated in the buttermilk and marinade for two hours in the refrigerator.

Heat a large non-stick skillet over medium heat.  Heat the olive oil and add the garlic cooking until the garlic become fragrant.  Add the tomatoes and stir until combined.  As the tomatoes begin to heat through, begin crushing the tomatoes with the back of your spoon.  Cook, stirring occasionally for 3-5 minutes.  Add the cumin and chili powder and cook stirring occasionally for another 3 minutes.  Add the shrimp, one at a time from their buttermilk soak.  Dispose of the buttermilk.  Lightly stir a couple of times and cook the shrimp in the tomato mixture until the shrimp begin to turn pink.  This should only take about 5 minutes.  You don't want to over cook the shrimp or they will get rubbery.  When they turn pink they are fully cooked.  Remove from the heat and add the lime zest, lime juice, and cilantro.  Salt and pepper to taste.  You can serve over rice as I did or I think it would be lovely with pasta or maybe wrapped in warm corn tortillas served as shrimp tacos. 

Going Green

You might be wondering, "What is this elusive green beverage you've concocted today Sara?"  I will tell you it is not a cocktail, it can be enjoyed any time of day, is very healthy for you, and does not taste like crap.  It is a Green Monster!  If you have done any amount of browsing in the blogosphere, you've probably come across a couple of Green Monster recipes.  Some call it their "secret diet weapon" others enjoy them for all of its lovely health benefits.  I drink them because they fill me up and I get a serving of calcium, omega-3s, fiber, veggies, and fruit all in one beverage.  There are not too many smoothie recipes that can manage all of the above benefits.  Not even a meal replacement drink. 

I started drinking the elusive Green Monster last year when I was going gluten-free.  I was tired of my usual egg bake breakfast.  Oatmeal totally does not agree with me.  Gluten-free cereals leave me feeling hungry an hour later.  Yogurt, even Greek yogurt, and fruit is not enough either.  So, I put my fears of drinking spinach aside and started whipping up Green Monsters. Here is how I make mine:

Green Monster Smoothie
(adapted from Angela Liddon @ Oh She Glows)

1 cup unsweetened almond milk
4 cups baby spinach
1 tablespoon ground flax seed
1 tablespoon nut butter (I use almond butter or peanut butter)
1 packet stevia sweetener
1 very ripe, peeled, and frozen banana

Blend all ingredients together until smooth.  That's it!  If I get bored I sometimes add a cup of frozen strawberries to change it up a bit.  For more Green Monster recipes, check out http://greenmonstermovement.com/

Wednesday, March 14, 2012

Better Than Panera

Finding gluten-free options at Panera Bread is nearly impossible.  Even most of there soups contain flour.  I understand, the word bread is in the name of the restaurant, but can't there be some options?  This is not the first time I've had issues with Panera.  See blog post from three years ago about their mindless waisting.  A year later, I also wrote a complaint letter to Panera about their prices and overall C+ quality.  Maybe they could lower their prices if they didn't waist all the heals and ends of their bread.  Did Panera lower their prices, no.  Did they give me a free gift card and apology phone call, yes.  But, that still has not elevated my issues with the company.  Now, I'll just make my own soups, salads, and spreads with integrity, health, and sans gluten. 

One of the most popular Panera salads available this time of year is some sort of strawberry and chicken concoction.  Why not make your own for far less the price and quality control at home?  I did and the Bear said my recipe was even better than Panera. 


Chicken & Berry Mixed Green Salad
(serve with Herbed Goat Cheese Toast)

For the salad:
2 cups grilled boneless, skinless chicken breast chopped into 1/2 inch strips
1 bag mixed spring greens (about 4 cups)
2 cups sliced strawberries
1/4 cup finely sliced red onion

For the dressing:
2 tablespoons extra virgin olive oil
2 tablespoons balsamic vinegar
1 tablespoon Dijon mustard
1 tablespoon honey
1/8 teaspoon crushed garlic
1/8 teaspoon herbes de Province

Divide salad greens, strawberries, red onion, and chicken evenly between four plates.  In a small dish, whisk together the olive oil, vinegar, mustard, honey, garlic, and herbs.  Lightly drizzle the dressing over the salads.  Serve with Herbed Goat Cheese Toast, recipe found below.

Herbed Goat Cheese Toast

1/2 cup softened goat cheese (you can use cream cheese if you do not like goat cheese or are looking to save some money)
2 tablespoons chopped fresh flat leaf parsley
2 tablespoons chopped fresh basil
1 tablespoon finely minced shallot
Pinch of salt
Pinch of freshly ground black pepper
4 gluten-free ciabatta rolls (such as Schar brand, they are my favorite from Hy-Vee)

Preheat oven to 350 degrees.  In a small dish combine goat cheese, parsley, basil, shallot, salt and pepper stirring until combined.  Cut ciabatta rolls in half and place on a baking sheet.  Spread 1 tablespoon of the goat cheese mixture onto each half.  Bake in the oven for 10 minutes or until the edges of the rolls are light brown.  Serve one roll (two halves) with the Chicken & Berry Mixed Green Salad recipe above.


Sunday, March 11, 2012

Pork & Rice Noodle Bowls with Peanut Sauce


In light of animation domination night and the NCAA basketball picks being on television, I decided to nix any attempt at pulling my husband away from the couch.  I don't always like to have dinner in the living room, but sometimes you have to give in.  This is a meal you can eat in front of the T.V.  and give into Chinese take-out cravings without any guilt on calories or sodium bloat.  Pork tenderloin replaces mystery meat and is served in a light peanut sauce with a lovely array of color from the veggies.

Pork & Rice Noodle Bowls with Peanut Sauce
(adapted from Cooking Light Great Plates)

1 package rice noodles
1/2 cup hot pasta water
1/4 cup peanut butter
2 tablespoons rice vinegar
2 tablespoons low-sodium soy sauce
1 teaspoon sesame oil
1 inch knob grated or finely minced ginger
1 clove crushed or finely minced garlic
1 teaspoon chile paste (sambal oelek)
2 tablespoons brown sugar
Non-stick cooking spray
1 pound pork tenderloin cut into 1/2 inch strips
2 cups thinly sliced red bell pepper
1 cup thinly sliced carrots
1 cup asparagus chopped into 1/2 inch pieces
1/2 cup thinly sliced green onions

Cook rice noodles according to package directions.  While the noodles are boiling, reserve 1/2 cup of the pasta water in a small dish and whisk together the next eight ingredients (peanut butter, rice vinegar, soy sauce, sesame oil, ginger, garlic, chile paste, and brown sugar) until the peanut butter is smooth and combined.  Set aside.

Heat a large nonstick skillet over medium-high heat.  Coat with cooking spray.  Add the pork and cook until the pork is cooked through (about 6-8 minutes).  Remove pork onto a plate and set aside.  Add the peppers, carrots, and asparagus to the skillet and cook, stirring occasionally for 5-7 minutes or until the veggies begin to soften.  Add the pork back to the skillet.  Drain and add the noodles to the skillet.  Add the sauce and toss until everything is well coated.  Sprinkle with green onions and serve.

Saturday, March 10, 2012

Saturday Menu Post

With spring in the air, I am feeling we need to freshen up our menu.  It is spring break and I am really looking forward to spending some extra time on the blog this week! Salads, grilling, and noodle bowls are planned for a fun, fresh take on this week's menu.  Here is the rundown!

Sunday 3/11        Pork and Rice Noodle Bowls with Peanut Sauce

Monday 3/12       Left-overs

Tuesday 3/13       Chicken & Berry Mixed Green Salad with Herbed Goat Cheese Toasts

Wednesday 3/14  Left-overs

Thursday 3/15      Sun-Dried Tomato Shrimp with Coconut Rice & Steamed Broccoli

What you will need for groceries:

1 pound pork tenderloin
2 boneless, skinless chicken breasts
1 pound large, peeled and deveined shrimp
1 bag mixed salad greens
1 bunch cilantro
1 knob ginger
1 head garlic
1 shallot
1 lemon
1 pint strawberries
1 bunch celery
1 small read onion
1 bunch green onions
1 large red bell pepper
1 bag baby carrots
1 jar all natural peanut butter
1 jar oil-packed sun-dried tomatoes
1 can light coconut milk
1 6 ounce package rice noodles
Brown rice (if you do not already have in your pantry)
1 jar chili paste with garlic (such as sambal oelek, can be found near the Asian items)
Sesame oil
Rice vinegar
1 bag frozen broccoli florets
1 loaf of fresh bread (mine will be gluten-free)
Goat cheese or 1/3 less fat cream cheese if you want to save a little money

Pantry items you will need if you do not have them:
Corn starch
Low-sodium soy sauce
Balsamic vinegar
Olive oil
Brown sugar
Dried tarragon
Paprika
Dried parsley
Dried thyme
Curry powder
Cooking spray

I look forward to having some great posts this week!  Enjoy your weekend!


Mexican Brown Rice Casserole

How is your weekend going?  We officially started spring break at 3:30 p.m. yesterday.  Yes!  One week of total freedom and pure enjoyment of lovely spring weather.  Last week was such a roller coaster with things to get done at work, that I realized I forgot to make a weekly menu post.  So sorry!  I did not realize that these posts have really come in handy for people.  My sister recently shared this with me after attending a wedding for a couple in our old hometown, Creston, Iowa.  So, many, many thanks to everyone who reads my little blog.  It means so much to me to help make your lives easier and share my recipes and tips with you.  That is my whole purpose for this blog.  I just want to share and make your lives healthier and tastier in the kitchen:)

With that being said, onto the Mexican Brown Rice Casserole.  This is a recipe I use when I need something I can make ahead, is truly healthy, but doesn't leave out flavor or bulk.  Layered with wonderful Mexican flavors you will not feel rushed when preparing this meal or left hungry.  Plus, there is plenty left-over to enjoy for another meal or lunch throughout the week!

Mexican Brown Rice Casserole
(adapted from Weight Watchers)

Non-stick cooking spray
4 cups cooked brown rice
2 15 ounce cans fat-free refried beans
1 can diced tomatoes with chilies (such as Rotel)
2 cans diced green chilies
1/2 tablespoon cumin cumin
1 tablespoon chili powder
1/8 teaspoon cayenne pepper
1 cup thawed frozen corn
10 ounces chopped frozen spinach, thawed and  drained
1 cup 2% shredded cheddar cheese

Preheat oven to 375 degrees.  Coat a large lasagna pan with cooking spray.  Spread and lightly press the brown rice onto the bottom of the pan.

In a large bowl, combine the refried beans, tomatoes, green chilies, cumin, chili powder, and cayenne pepper.  Using a rubber spatula, spread the bean mixture on top of the rice and smooth out the top.  Next, sprinkle the corn on top of the beans.

Squeeze any excess watter from the spinach and sprinkle on top of the corn layer.  Top with the shredded cheese.  Bake the casserole until heated through and the cheese is bubbly, about 30 minutes.  Let cool for 10 minutes before serving.  Cut into 6 large servings.  You can garnish the dish with salsa and fat-free sour cream.  So easy and tasty!


Wednesday, March 7, 2012

How to Use Those Herb Mixtures

I don't know about you, but I tend to get a lot of spice and herb mixtures as gifts.  Don't get me wrong.  I use a lot of spices and herbs in my cooking.  I even tend to dabble in concocting my own spice rubs and herb mixtures.  When birthdays or holidays role around, people tend to think that pre-made concoctions are the perfect gift for the culinary recipient.  That's cool; however, we find it often difficult to use the whole jar before the mixture grows old and awry.  Recently, my dad asked me if there was any sort of spice mixture I was excited about.  After watching an episode of Giadda that day, I replied, "Herbes de Province."  My doting father bought me a jar for my stocking and low and behold I now have a jar of Herbes de Province.  Now I'm thinking, "What the heck am I supposed to do with a whole jar?!" 

This is when I get creative.  While it has been a very warm winter, only my sage has managed to survive.  Justin and I both are scratching at the urge to get grilling again, but we are missing the flavor punch fresh herbs add to marinades and summer dishes.  Hebes de Province offer all of the fresh flavors of summer time herbs you are looking for without the summer herb garden glory.  The weather is heating up and you know you want to use your grill my friend.  So, gear up for my simple marinade and add a tablespoon of Herbes de Province and marinate one pound of chicken or pork.  Then serve this as your side and get double duty out of your fancy spice mixture you got for a gift:

Potato & Pepper Packets with Herbes de Province

1 pound uncooked red potatoes, scrubbed and thinly sliced (about 3-4 cups)
2 red peppers cut into thin strips (about 2 cups)
1 medium red onion, thinly sliced (about 1 cup)
4 tablespoons olive oil
1 teaspoon Dijon mustard
2 tablespoons freshly squeezed lemon juice or juice of one lemon
1 crushed or finely minced garlic clove
1/2 teaspoon salt
1 teaspoon Herbs de Province

Preheat grill.  Tear off four 12 inch long pieces of aluminum foil.  Spray with non-stick cooking spray.

In a small dish, whisk together the olive oil, Dijon mustard, lemon juice, garlic, salt, and herbs until combined.  Set aside.

In a large bowl, combine all veggies and pour the herb mixture over the veg.  Toss until mixed and coated.  Spread 1 1/2 cups of the veggie mixture in the middle of the foil.  Fold the foil corners to form a packet and fold to make a tight seal.

Grill packets, turning a few times, until the potatoes are tender and beginning to brown.  This should take roughly 20-30 minutes depending on the temperature of your grill.  Here are some visual steps to aid in the folding:


Tuesday, March 6, 2012

Kaboom!!

What happens at night, leaves you standing in the middle of a major interstate highway, and explodes?  Now that I've really got your attention, I'll explain.  Saturday my husband invited me to come on the job with him to watch the Quivira bridge demolition.  He is a civil engineer for the City of Overland Park.  His usual duties include overseeing street projects, bridge inspections, designing and building new hiking and biking trails.  Justin also serves as a liaison for the city and the Kansas Department of Transportation.  This includes getting to watch bridges be built and demolished.  Yes, your tax dollars are being well spent by the government on improving our city and state's infrastructure. I not only got to watch the explosion, but also took a sweet ride in a bucket truck and learned lots of interesting procedures that are involved in blowing up a bridge.  Here is a video clip of the excitement:


Friday, March 2, 2012

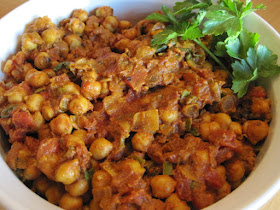
Chana Masala

Have you ever wanted to make something really exotic, but didn't really have any clue what to make? This recipe takes the flavors of India and creates a lovely, spice packed punch that will bring your culinary taste to a new level.  Sounds complicated, but it is not!  You only need one skillet and a pot to make your rice.  Chana Masala will ignite your metabolism, is very simple to make, and is vegetarian friendly.  So the next time you have vegetarian friends over for dinner, I suggest making Chana Masala.


For my work friends, this is what I have been bringing to work for lunch this week. I know a lot of you have been asking what has made the lounge smell so good after I've reheated the dish in the microwave. 

Chana Masala
(adapted from Eat, Live, Run)

2 tablespoons butter
2 crushed garlic cloves
1 large yellow onion, chopped
1 jalapeno pepper, seeded and diced
1 inch knob grated or finely minced ginger
4 tablespoons tomato paste
1 15 ounce can diced tomatoes
2 15 ounce cans chickpeas, drained and rinsed
4 tablespoons freshly chopped cilantro
1 tablespoon coriander
1 teaspoon cumin
1 teaspoon garam masala
1/4 cayenne pepper
1 teaspoon turmeric
 
In a large skillet, melt and heat the butter. Once melted, add the onions and caramelize for about 15 minutes on medium low heat, or until golden brown.  Once the onions have caramelized, add the garlic, ginger and jalapeno and stir well. Saute until softened.  Add the tomato paste and stir until combined.  Cook mixture until a crust begins to form on the bottom of the pan.  Add the coriander, cumin, cayenne and turmeric and stir well. Then add the diced tomatoes, chickpeas, garam masala, and cilantro.  Cook for about five minutes or until the chickpeas have heated through. Serve over rice cooked according to package directions.  I used long grain white rice and it was divine!